DNS Cutover for Custom Checkout Domain
When migrating to Commerce Connect, you must configure a custom checkout subdomain with proper DNS records to redirect checkout traffic to BigCommerce while keeping your main WordPress® site on WP Engine.
Overview
Section titled “Overview”Commerce Connect uses a custom checkout subdomain (e.g., checkout.www.yourdomain.com) to handle the checkout process through BigCommerce while keeping your WordPress® site on WP Engine infrastructure.
Why a custom subdomain?
- BigCommerce hosts the checkout experience on their infrastructure
- Your WordPress® site remains on WP Engine for content and product pages
- Customers are seamlessly redirected to the checkout subdomain when they proceed to checkout
- After completing their purchase, customers return to your WordPress® site
Prerequisites
Section titled “Prerequisites”Before configuring DNS:
- WordPress® Commerce Connect plugin installed and configured
- Access to your DNS provider (WP Engine DNS, Cloudflare, etc.)
- Permissions to add/modify DNS records
- BigCommerce store connected to WordPress®
Step 1: Find Your DNS Records
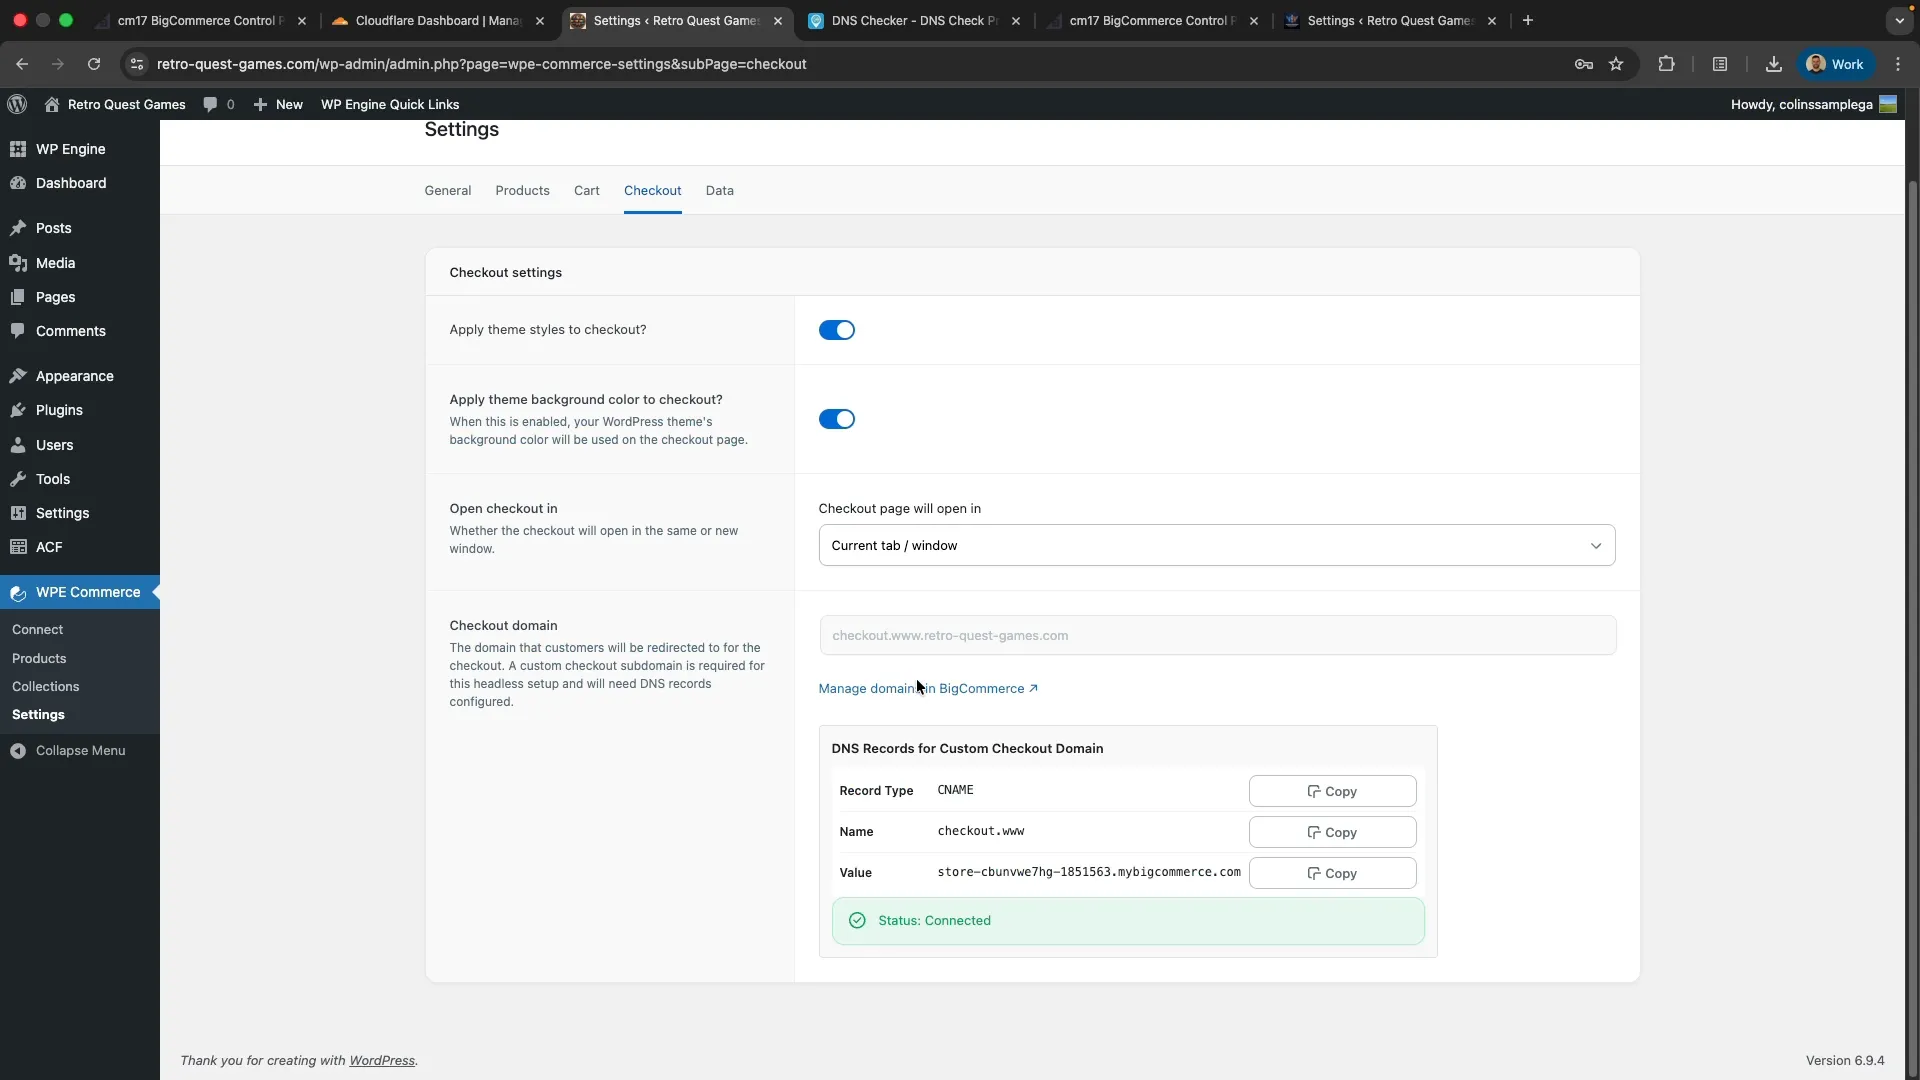
Section titled “Step 1: Find Your DNS Records”Navigate to WordPress® Admin → WP Engine Quick Links → WP Commerce → Settings → Checkout tab.
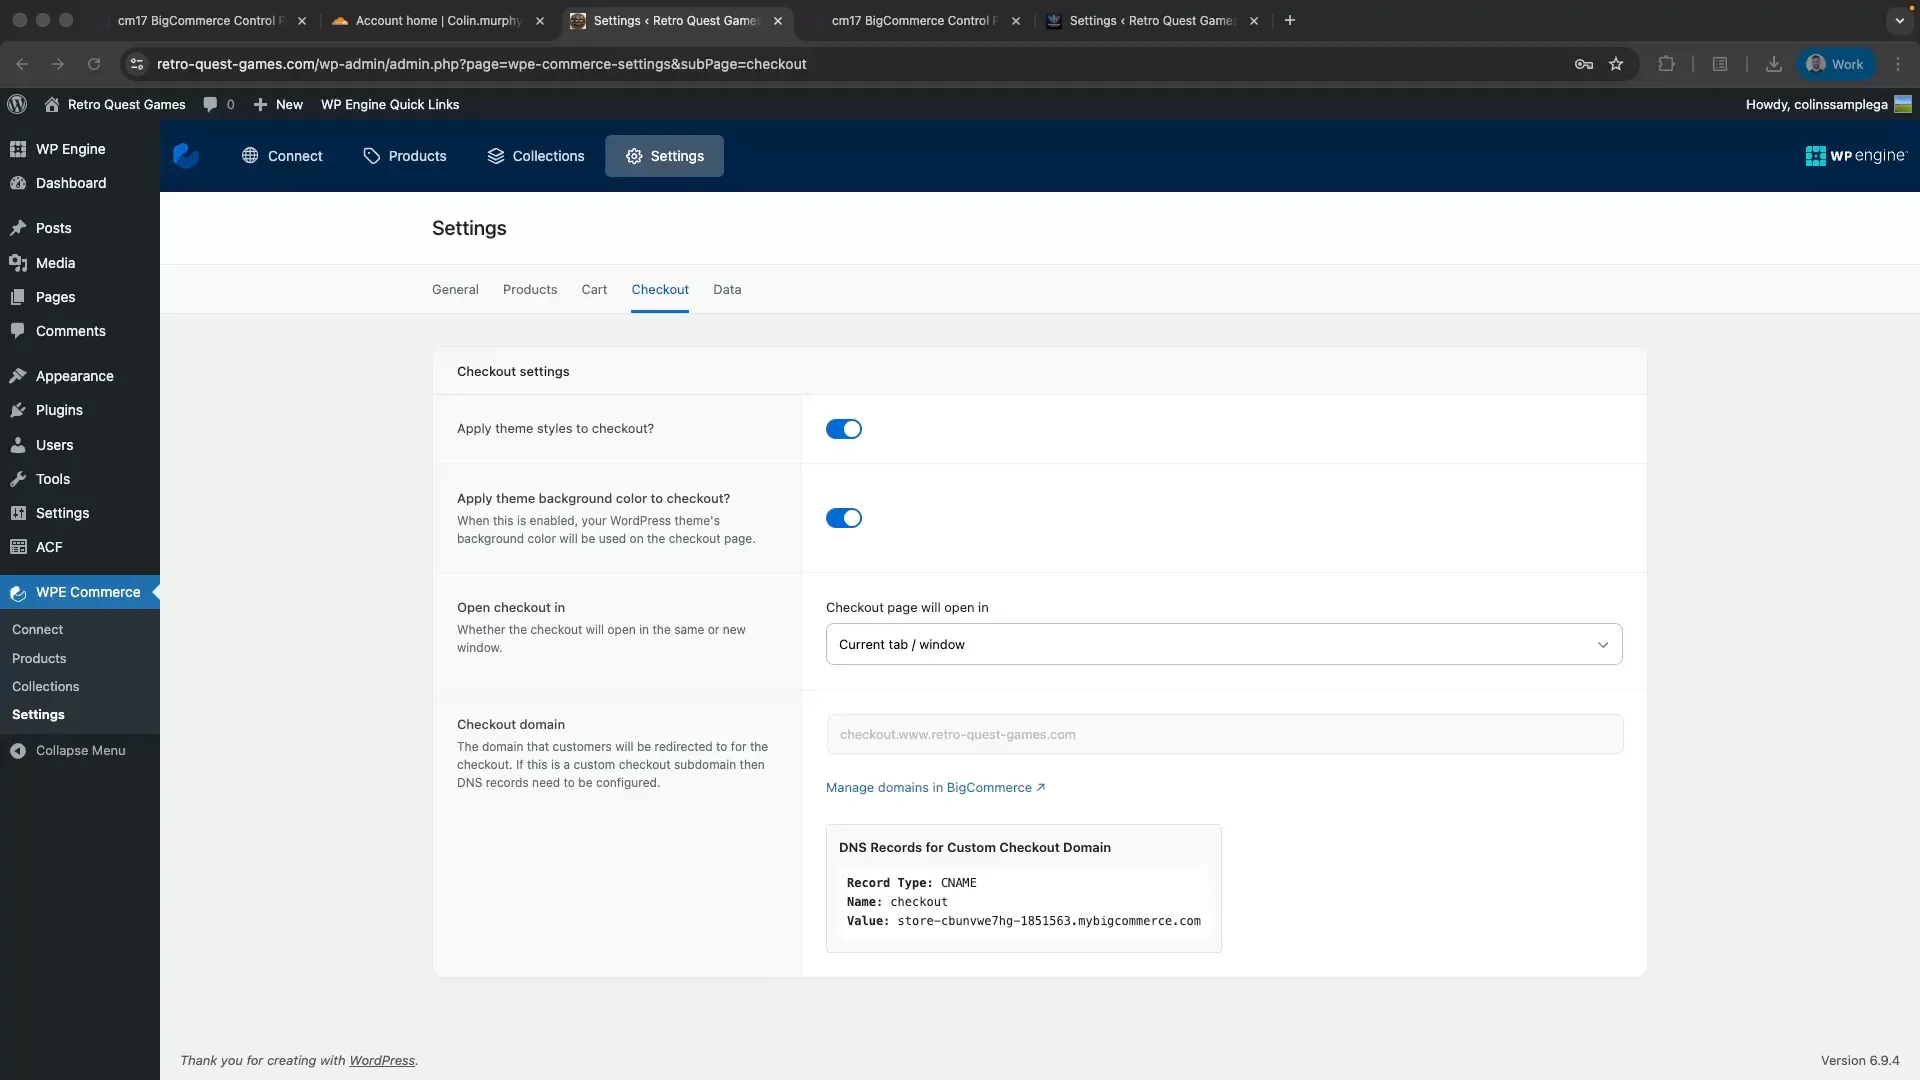
Scroll to the DNS Records for Custom Checkout Domain section. You’ll see three values:
- Record Type:
CNAME - Name: Your checkout subdomain prefix (e.g.,
checkout-www) - Value: Your BigCommerce store domain (e.g.,
store-xxxxx.mybigcommerce.com)
At this stage, you’ll see a warning:
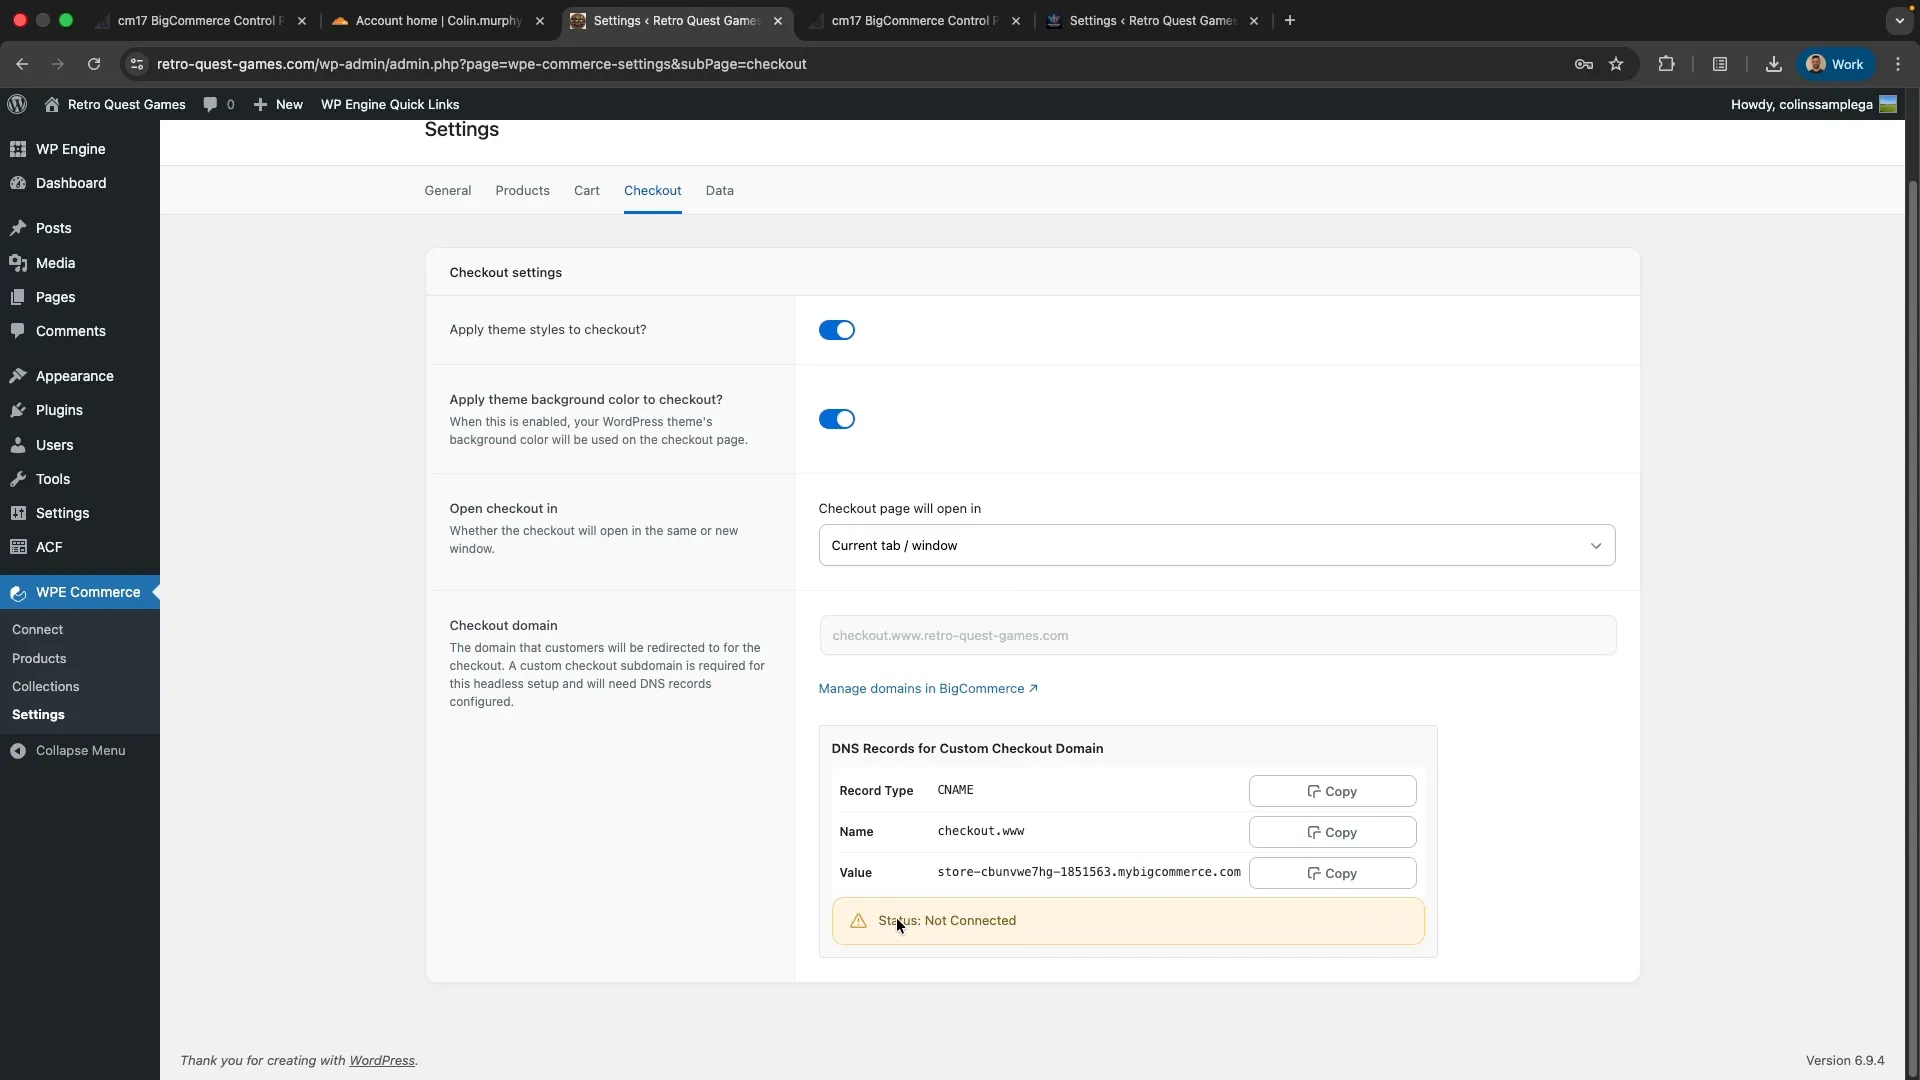
This is expected - the status will change to “Connected” after you add the DNS records and they propagate globally.
Step 2: Add DNS Records
Section titled “Step 2: Add DNS Records”If Using WP Engine DNS
Section titled “If Using WP Engine DNS”- Log into WP Engine User Portal
- Navigate to Domains → [yourdomain.com] → DNS
- Click Add Record
- Select CNAME from the record type dropdown
- Name: Paste the Name value from WordPress® settings
- Value: Paste the Value from WordPress® settings
- TTL: Set to
300(5 minutes) for faster propagation during testing - Click Add Record
If Using Cloudflare
Section titled “If Using Cloudflare”- Log into Cloudflare dashboard
- Select your domain
- Navigate to DNS → Records
- Click Add record
- Type: CNAME
- Name: Paste the Name value from WordPress® settings
- Target: Paste the Value from WordPress® settings
- Proxy status: Click the orange cloud to turn it gray (DNS only)
- ⚠️ Critical: Cloudflare proxy must be OFF or BigCommerce cannot verify the domain
- TTL: Auto (or 300 for testing)
- Click Save
If Using Another DNS Provider
Section titled “If Using Another DNS Provider”Add a CNAME record with:
- Type: CNAME
- Host/Name: [Name from WordPress® settings]
- Value/Target: [Value from WordPress® settings]
- TTL: 300 (or lowest available)
Step 3: Verify DNS Propagation
Section titled “Step 3: Verify DNS Propagation”DNS changes can take up to 48 hours to propagate globally. Use DNSChecker.org to monitor propagation status:
- Go to https://dnschecker.org
- Enter your checkout subdomain (e.g.,
checkout.www.yourdomain.com) - Select CNAME record type
- Click Search
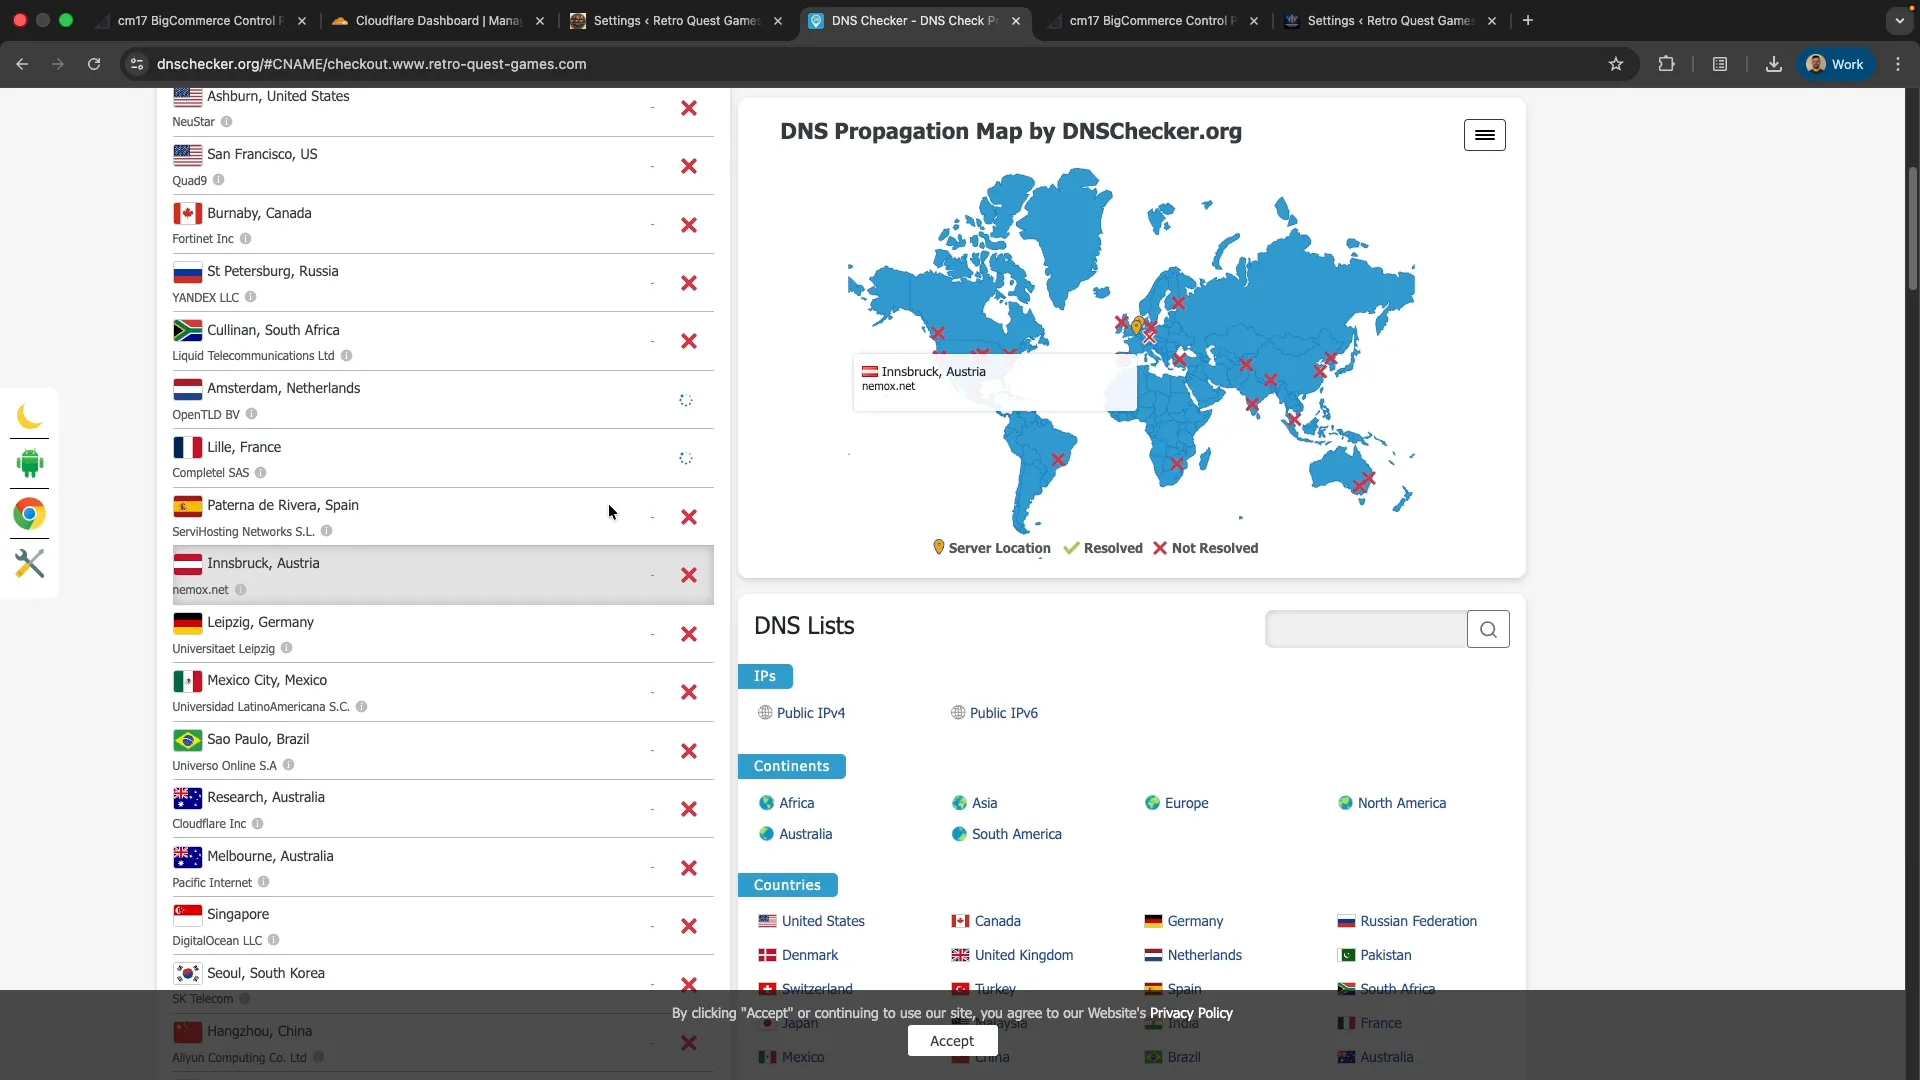
Watch for green checkmarks across regions. Target: 90%+ regions showing correct CNAME before proceeding.
Priority regions to verify:
- North America (US East, US West, Canada)
- Europe (UK, Germany, France)
- Asia Pacific (Australia, Singapore, Japan)
Command-Line Verification
Section titled “Command-Line Verification”You can also verify DNS resolution using the dig command:
dig checkout.www.yourdomain.com CNAMEExpected output:
checkout.www.yourdomain.com. 300 IN CNAME store-xxxxx.mybigcommerce.com.Step 4: Confirm Connection in WordPress®
Section titled “Step 4: Confirm Connection in WordPress®”Return to WordPress® → WP Commerce → Settings → Checkout tab.
Once DNS has propagated, the status will change from “Not Connected” to:
✅ You’re ready to proceed when you see “Status: Connected” with a green checkmark.
Step 5: Verify BigCommerce Configuration
Section titled “Step 5: Verify BigCommerce Configuration”Log into your BigCommerce admin panel to confirm the custom domain is recognized:
- Navigate to BigCommerce Settings → Domains (or wherever custom domains are managed in your BigCommerce plan)
- Verify your custom checkout domain appears in the domain list
- Confirm domain status shows as active/connected
This cross-verification ensures both sides (WordPress® and BigCommerce) recognize the custom domain configuration.
Step 6: Test End-to-End Checkout
Section titled “Step 6: Test End-to-End Checkout”Before going live, test the complete checkout flow:
- Open your WordPress® storefront (as a customer, not logged in)
- Add a product to cart
- Click Checkout button
- Verify: Browser URL changes to your checkout subdomain (e.g.,
checkout.www.yourdomain.com) - Verify: BigCommerce checkout loads (not WordPress®/WooCommerce® checkout)
- Fill out test customer information (use test credit card)
- Complete order
- Verify: Order appears in BigCommerce admin
- Verify: Order confirmation email sent
Troubleshooting
Section titled “Troubleshooting””Status: Not Connected” After 48 Hours
Section titled “”Status: Not Connected” After 48 Hours”Check:
- Verify DNS record exists in your DNS provider
- Run
dig checkout.www.yourdomain.com CNAME- does it return the correct BigCommerce domain? - Check DNSChecker.org - is propagation complete (90%+ regions)?
- Compare CNAME value in DNS provider to WordPress® settings - any typos?
- If using Cloudflare, is Proxy OFF (gray cloud, not orange)?
If DNS is correct but still not connected:
- Contact BigCommerce support - they may need to allowlist your custom domain
- Check BigCommerce admin - is the custom domain configured on their side?
Checkout Redirect Not Working
Section titled “Checkout Redirect Not Working”Symptom: Clicking “Checkout” doesn’t redirect to BigCommerce
Check:
- Is Commerce Connect plugin activated?
- Is WooCommerce® plugin deactivated (if migrating from WooCommerce®)?
- Check WordPress® settings: Is checkout domain field populated?
- Check browser console for JavaScript errors
- Clear WordPress® cache (if using caching plugin)
Common causes:
- JavaScript conflict with theme or plugin
- Caching plugin preventing redirect
- Incorrect plugin configuration
Checkout Loads But Shows Error
Section titled “Checkout Loads But Shows Error”Symptom: Redirect works but BigCommerce checkout shows an error
Check:
- Are products synced from BigCommerce to WordPress®?
- Does BigCommerce have inventory for the product?
- Is BigCommerce store in “maintenance mode” or “test mode”?
- Check BigCommerce admin for error messages
DNS Propagation Stuck at 50%
Section titled “DNS Propagation Stuck at 50%”Symptom: DNSChecker shows some regions green, others red, not improving
Check:
- TTL setting - is it very high (>3600)? High TTL slows propagation
- Time elapsed - have you waited at least 2x the TTL duration?
Solutions:
- Lower TTL to 300, wait for old TTL to expire, then update record
- Wait longer - 48 hours is common for global propagation
- Flush local DNS cache:
sudo dscacheutil -flushcache(macOS)
DNS Provider Rejects Subdomain
Section titled “DNS Provider Rejects Subdomain”Symptom: DNS provider rejects checkout.www.yourdomain.com as invalid or shows “too many levels” error
Root Cause: Some legacy DNS providers don’t support third-level domains (sub-subdomains)
Solutions:
- Migrate DNS to modern provider:
- Cloudflare (free, supports unlimited subdomain levels)
- WP Engine DNS (included with hosting)
- AWS Route 53 (paid)
- Alternative approach:
- Move WordPress® to apex domain (
yourdomain.cominstead ofwww.yourdomain.com) - Checkout becomes
checkout.yourdomain.com(second-level only) - Caution: May require additional DNS changes and site URL updates
- Move WordPress® to apex domain (
Post-Cutover Steps
Section titled “Post-Cutover Steps”After successful cutover and 24-48 hours of stable operation:
- Raise TTL to 3600 (1 hour) or 86400 (24 hours) for better performance
- Monitor checkout conversion rate for any drops indicating regional DNS issues
- Set up uptime monitoring for your checkout subdomain
- Document the configuration for future reference
TTL Recommendations
Section titled “TTL Recommendations”TTL (Time To Live): How long DNS records are cached before re-checking
- During initial setup: 300 seconds (5 minutes) - allows rapid testing and rollback
- After successful cutover: 3600 seconds (1 hour) - reduces DNS query load
- Before major changes: Lower back to 300 at least 24 hours before planned changes
DNS Record Details
Section titled “DNS Record Details”Why CNAME (Not A Record)?
Section titled “Why CNAME (Not A Record)?”Commerce Connect requires a CNAME record (not an A record) because:
- BigCommerce’s checkout infrastructure may change IP addresses
- CNAME follows BigCommerce’s infrastructure changes automatically
- A record would require manual updates if BigCommerce changes IPs
Subdomain Patterns
Section titled “Subdomain Patterns”Commerce Connect generates a checkout subdomain based on your WordPress® installation URL:
| WordPress® URL | Checkout Subdomain |
|---|---|
www.yourdomain.com | checkout.www.yourdomain.com |
yourdomain.com | checkout.yourdomain.com |
Rollback Procedure
Section titled “Rollback Procedure”If you need to rollback after cutover:
Option A: Quick Rollback (Recommended for Emergencies)
Section titled “Option A: Quick Rollback (Recommended for Emergencies)”- Re-activate WooCommerce® plugin (if migrating from WooCommerce®)
- Deactivate Commerce Connect plugin
- WooCommerce® checkout works immediately
- Downside: Customers may have placed orders in BigCommerce during cutover - requires manual reconciliation
Option B: Full Rollback
Section titled “Option B: Full Rollback”- Remove CNAME record from DNS provider
- Re-activate WooCommerce® plugin
- Deactivate Commerce Connect plugin
- Wait for DNS propagation (checkout broken during this period - can take hours)
WP Engine-Specific Considerations
Section titled “WP Engine-Specific Considerations”If you’re hosting your WordPress® site on WP Engine:
DNS Management
Section titled “DNS Management”WP Engine DNS typically propagates faster than most providers (5-15 minutes), but still verify with DNSChecker before proceeding.
To add DNS records in WP Engine:
- Log into WP Engine User Portal
- Navigate to Domains → [yourdomain.com] → DNS
- Follow the steps in Step 2: Add DNS Records above
CDN and Global Edge Security
Section titled “CDN and Global Edge Security”Good news: No additional configuration needed.
- WP Engine CDN only applies to your main WordPress® site (
www.yourdomain.com) - Checkout subdomain (
checkout.www.yourdomain.com) bypasses WP Engine infrastructure and goes directly to BigCommerce - Global Edge Security (GES) doesn’t apply to the checkout subdomain - BigCommerce has its own DDoS protection
The checkout subdomain is completely independent of your WP Engine infrastructure.
Next Steps
Section titled “Next Steps”After DNS cutover is complete:
- ✅ Verify “Status: Connected” in WordPress®
- ✅ Verify custom domain in BigCommerce admin
- ✅ Test end-to-end checkout flow
- ✅ Monitor checkout for 24-48 hours
- → Proceed with product sync and data migration